
SHOPIFY STORE SETUP STEP-BY-STEP GUIDE
Starting an online business is easier than ever with Shopify, one of the most powerful eCommerce platforms available today. If you want to build a successful online store, a clean and correct Shopify store setup is the first step. This guide will walk you through everything: what you need, how to set up Shopify step-by-step, and how to publish your online store in the fastest and most beginner-friendly way. Whether you’re a beginner or an experienced seller shifting from another platform, this Shopify setup tutorial will save your time and help you avoid common mistakes.
Step-by-Step Shopify Store Setup Guide
1. Create An Account
Visit Shopify’s website and click the Start free trial button.Next, you will be presented with a series of questions, each with the premade answer choices. You have the option to skip them entirely or select the answers that best match your preferences and business needs.After entering your email address, creating a password and choosing a unique store name, you’ll be redirected to the admin panel. Now you’re ready to set up your Shopify store and begin your four-day free trial.
2. Get Familiar With The Admin Panel
On your admin panel, you will find the following features:
- Orders: Manage and view a list of your Shopify store’s orders, including order fulfillment, cancellations and reviews.
- Products: Add, edit and manage your inventory of products including uploading images, writing descriptions and setting prices.
- Customers: Access a list of registered customers and their contact information and handle customer list exports.
- Content: Publish and manage all content on your e-store to improve your store’s visibility and engage with your audience.
- Finances: Keep track of your Shopify store’s finances, including revenue, expenses and profits, to monitor the financial health of your business.
- Analytics: View sales numbers, revenue and product performance over periods of time to track your store’s performance.
- Marketing: Configure multichannel promotions through Shopify Email Marketing, Facebook advertising, social posts and SMS marketing. Set up automated marketing like abandoned cart emails.
- Discounts: Create and manage discount codes with various rules, such as free shipping for specific order amounts or discounts on certain products.
- Apps: Install and manage apps to extend your Shopify store’s functionalities. Search for apps in categories like store design, conversion, fulfillment, customer service and more.
2. Get Familiar With The Admin Panel
When you open an account with Shopify, a default theme is already set up on the Themes page of your admin. If you want to choose a different Shopify theme, you can add one to your admin panel by clicking on the Online Store button and selecting Themes from the dropdown menu.
Scroll down to the Popular free themes section to see the top free themes available from the Shopify Theme Store. Alternatively, click on Visit theme store to explore all available themes.
When you find a theme you like, click the Add button. This will add the theme to the Theme library section on the Themes page of your admin.
To see how your theme will look on the front end, click on the three dots displayed on the Theme library block and choose the Preview option.
This action will give you a good insight into how your Shopify store will be presented to your users.Scroll down to the Popular free themes section to see the top free themes available from the Shopify Theme Store. Alternatively, click on Visit theme store to explore all available themes.When you find a theme you like, click the Add button. This will add the theme to the Theme library section on the Themes page of your admin.
4. Add Navigation To Your Theme
To add navigation to your theme, go to Online store >“Navigation section of your Shopify admin panel.
To customize your footer menu, click on Footer menu link > Add menu items. This action will open a side slider bar where you can name your items and search or paste a link.
Scroll down to the Popular free themes section to see the top free themes available from the Shopify Theme Store. Alternatively, click on Visit theme store to explore all available themes.
When you find a theme you like, click the Add button. This will add the theme to the Theme library section on the Themes page of your admin.Shopify also allows you to create nested menus where you can group your products or pages or create additional drop-down menus.
5. Add Products & Product-Related Content
To add and organize your products and product-related content on your Shopify store, follow these steps:
To add a new product:
- Go to Products
- Click Add product
- Enter a title for your product and provide additional details
- Click Save
To include and exclude products from your sales channels:
- Go to Products
- Click the product’s name to open its details
- Click Manage > Manage sales channels
- Select the sales channels and apps where you want to include the product
- Click Done and then Save
To add or remove tags:
- Go to Products
- Click the name of a product to edit or create a new product
- In the Organization section, add or remove tags separated by commas
- Click Save
To edit a search engine listing preview:
- Go to Products
- Click the name of the product you want to edit
- In the Search engine listing preview section, click Edit website SEO
- Enter a descriptive page title and description for the search engine listing
- Click Save
To archive a product:
- Go to Products
- Click the product you want to archive
- On the product details page, click Archive product
To delete a product:
- From your Shopify admin, go to Products
- Click the product you want to delete
- On the product details page, click Delete product
6. Set Up Payments & Checkout
Here’s a step-by-step guide to help you set up Shopify Payments:
- Review eligibility: Before you start, make sure your store is eligible for Shopify Payments based on your location. Check the list of supported countries and regions.
- Set up two-step authentication: Ensure you have two-step authentication (2FA) activated for your Shopify account. This is a security measure to protect your account and financial information.
- Activate Shopify payments: To activate Shopify Payments, go to Settings and then Payments. Click Activate Shopify Payments in the Shopify Payments box and confirm your choice in the dialog. This will remove any other credit card payment provider from your account.
- Provide business and banking details: Make sure the information is accurate and complete.
- Set up store currency: Choose the currency you want to use for pricing products and generating reports. Select the appropriate currency before making your first sale.
- Complete account setup: Depending on your business type and location, provide additional details such as Business Number, EIN, Taxpayer Identification Number (TIN) and personal details for an account representative if applicable.
- Provide VAT Number (for European stores): If your Shopify store is located in Europe, provide a Value-Added Tax (VAT) number or indicate that you don’t have one. Shopify verifies VAT numbers through the VAT Information Exchange System.
- Add verification documents: Upload documents for identity and home address verification. Make sure these documents are clear, valid and up to date.
- Wait for document review process: Your uploaded documents will be reviewed to match the information on your Shopify Payments account. Payouts might be on hold during this process, but your Shopify store should remain operational.
- Configure settings: After setting up Shopify Payments, you can configure payment settings according to your preferences. You can also perform a test transaction to ensure everything is working as expected.
- Get support: If you encounter any issues or need further assistance, you can contact Shopify Support for guidance.
It’s important to note that the process might vary based on updates to the Shopify platform or changes in regulations. Always refer to the official Shopify documentation for the most accurate and up-to-date instructions.
Setting up the checkout page on Shopify involves just a few simple steps:
Add a checkout button: Click on Settings and select Checkout from the dropdown menu on the Settings page.
Configure checkout settings: In the checkout settings, you can customize various aspects of the checkout process, such as: — Checkout language and style — Customer accounts and preferences – Shipping and delivery options — Taxes and currency settings.
7. Create Your e-Store’s Pages
To add pages to your Shopify online store, navigate to Online Store > “Pages.
To add a new page, click the Add page button. Enter a title and content for the new page. Be descriptive and clear in your title, as it will appear in browser tabs and search engine results. Use the rich text editor to format your content, add links, tables, images and videos.
Here’s what you’ll do next:
- Set visibility: In the visibility section, choose when the page should be published. By default, new webpages are visible when you save them. You can also set a specific publish date or choose to hide the page.
- Save the page: Click the Save button to create the new webpage.
- Add the link to navigation menu: To make the new webpage accessible through your online Shopify store’s navigation menu, you need to add the link to it. You can do this by editing your store’s navigation menu settings.
- Edit a webpage: If you need to make changes to an existing webpage, navigate to the Pages section, click the title of the page you want to edit, make your changes and click Save.
8. Set Up Shipping Rates
To set up shipping rates on Shopify, go to Settings > Shipping and delivery and select the shipping profile you want to work with and click Manage.
From there follow these steps:
- Add shipping rate: Click Add rate and set rate details. Enter the name for the rate and the applicable shipping rate value (e.g., amount, currency, weight, etc.)
- Add conditions (optional): Depending on the type of rate, you can add weight-based, price-based, or other conditions to qualify for the shipping rate.
- Adjust calculated rates (optional): If using calculated rates, you can mark up or discount the rates to adjust what customers see at checkout.
- Save the rate: Click Done and then click Save to add the shipping rate.
- Set up local currency shipping rates (Shopify Payments only): If using Shopify Payments, you can offer flat shipping rates in local currencies for customers from different markets.
Remember to regularly review and adjust your shipping rates as needed to provide accurate and competitive options for your customers at checkout.
9. Set Up Tax Rates
Before you begin setting up taxes in Shopify, you need to determine whether you should charge taxes on your products. Consult with local tax authorities or a tax professional to ensure that you’re following the correct tax regulations.
Make sure you register and obtain your tax number. If you need to charge taxes, register with the relevant tax authorities in your country or region and obtain your tax number.
Once you’ve got these legal issues solved, follow these steps:
- Access tax settings: From your Shopify admin, go to Settings > Taxes and duties.
- Select your country or region: In the Manage sales tax collection section, click on your country or region.
- Collect sales tax: Click Collect sales tax to set up tax collection for the selected country or region.
- Enter tax number: In the Tax number field, enter your tax number. If you haven’t received your tax number yet, you can leave this field blank and update it later.
- Confirm tax collection: Click Collect tax to confirm tax collection for the selected region.
- Add more regions (optional): If you need to set up taxes for additional regions or account numbers, click Collect sales tax again to add more regions.
- Manage tax settings: Once you’ve set up your tax regions, you can manage other tax settings, including tax overrides, exemptions and tax calculations. This allows you to ensure that you’re charging the correct tax rates wherever you sell.
10. Connect Your Domain
To connect your domain to your Shopify store, do the following:
- From your Shopify admin, go to Settings > Domains
- Click Buy new domain or Connect existing domain.
- If you are connecting an existing domain, enter your domain name (e.g., clothing-products.info) and click Next.
- Click Connect automatically and then click Close.
- Wait up to 48 hours for your domain to be verified. Once verified, it will be listed in the third-party domains section of the Domains page with the status Connected.
11. Test Your Shopify Store
Before you launch your Shopify store, it’s best if you place a test order.
From your Shopify admin, go to Settings > Payments and click Edit. On the check box mark the Use test mode option and click Save.
Next, you’ll need to simulate a successful transaction, and here is how:
- Go to your online store
- Add a product to your cart
- Follow the checkout process as if you were a customer
For testing purpose, use the following test credit card details:
- Name on card: Enter at least two words.
- Expiry date: Enter any future date.
- CVV: Enter any three digits
- Card number: Use one of the following test card numbers based on the card type:
- Visa: 4242424242424242
- Mastercard: 5555555555554444
- American Express: 378282246310005
- Discover: 6011111111111117
- Diners Club: 30569309025904
- JCB: 3530111333300000
This will simulate a successful transaction without actual charges.
12. Launch
Once you’re ready to make your Shopify store accessible to the public, you need to remove the password protection:
- From your Shopify admin, go to Online Store > Preferences
- Scroll down to the Password protection section
- Uncheck the option Restrict access to visitors with the password
- Click Save
After removing the password protection, your Shopify store is officially live and accessible to the public.
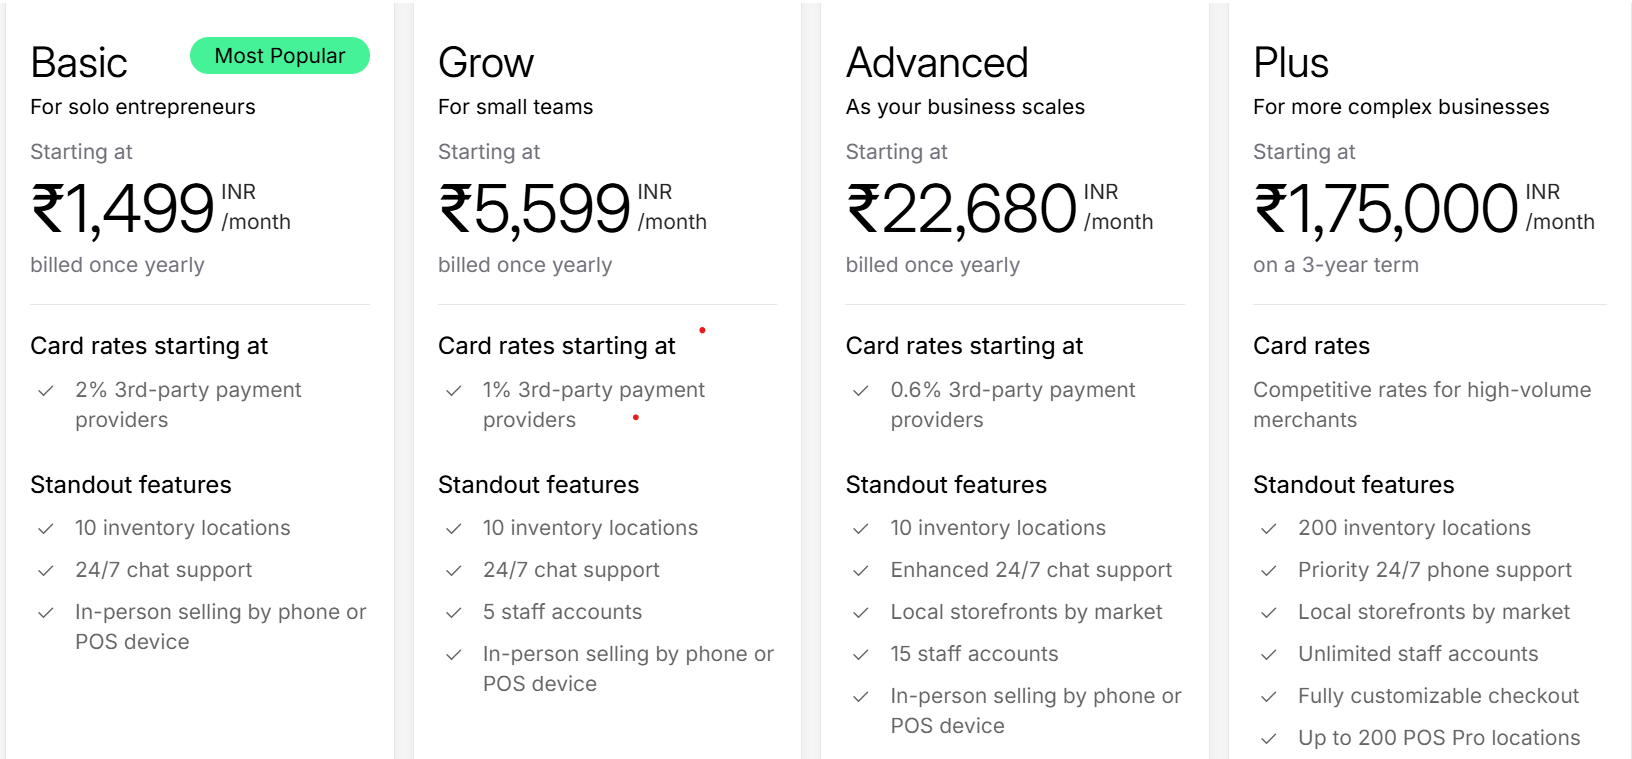
How Much Does It Cost To Start A Shopify Store?
Shopify offers multiple payment options, including:
There is also an option where you can choose your components and get the pricing plan modeled according to your component usage.
What Are The Legal Requirements For Setting Up A Shopify Store?
Setting up a Shopify store involves several legal requirements to ensure compliance with ecommerce laws and regulations.
While this information provides a comprehensive overview, it is important to consult with legal professionals for specific guidance tailored to your situation.
Here are the key legal requirements to consider when setting up a Shopify store:
- Business Registration: Register your business as a sole proprietorship, one-person company, or other structure.
- GST Registration: Obtain a Goods and Services Tax (GST) number, as it is mandatory for all sales.
- PAN Card: You need a Permanent Account Number for the business to conduct transactions legally.
- Business Bank Account: Open a separate bank account for your business.
- Payment Gateway: Set up payment gateways to process transactions.
- Industry-Specific Licenses: Depending on your products, you may need additional licenses. For example:
- FSSAI License: Required for selling food products.
- BIS Certification: Necessary for electronics and toys.
- Legal Metrology License: Important for items where accurate weights and measures are critical, like cosmetics.
- Industry-Specific Licenses: Depending on your products, you may need additional licenses. For example:
- Trade License: Check if you need a local trade license.
- Shop and Establishment License: Obtain this license, which is often required for commercial establishments.
- Legal Pages: Create and publish essential pages on your Shopify store, including:
- Privacy Policy
- Terms of Service
- Return and Refund Policy
- Shipping Policy
- Customize and Display: These pages protect your business and inform customers. You can find customizable templates in your Shopify admin under “Settings > Policies”.
- Trademark Registration: If you plan to protect your brand name and logo, register your trademark.
- Business Plan: A business plan is recommended to help you understand your goals and requirements.
A well-executed Shopify Store Setup is more than a series of technical steps—it is the strategic foundation that shapes the performance, reliability, and long-term scalability of your eCommerce business. Throughout this guide, you have gained clarity on the essential components of a high-quality Shopify Store Setup, including product structure, theme configuration, navigation logic, payment processing, shipping rules, and core launch readiness. When these elements are implemented with precision, your store becomes faster, easier to manage, and significantly more conversion-friendly.
For businesses entering the online market or planning to streamline existing operations, a professional Shopify Store Setup plays a critical role in eliminating avoidable errors and ensuring consistent performance from day one. Many brands choose expert-driven Shopify configuration to ensure their store is fully optimised for user experience, SEO, mobile responsiveness, and long-term eCommerce growth.
If you want your Shopify store to be cleanly structured, technically sound, and prepared for high-performance growth, you can Set Up Your Shopify Store With Digital Anaconda.
Our team builds streamlined, SEO-ready, conversion-focused Shopify stores tailored to your business model and product category. From theme optimisation and store configuration to performance tuning and launch preparation, we ensure every part of your Shopify Store Setup meets the highest professional standards.Share your business goals anytime, and we can prepare a customised Shopify setup roadmap designed specifically for your growth.